Showing posts with label Autumn Days. Show all posts

Sunday, 29 July 2012

Tutorial for my Star Card of Garden Scenes

On Friday I posted this card and promised a tutorial on how I made.  This is the first time I've written a tutorial, so let me know if there's anything that isn't clear and I'll edit it accordingly!


I will give the supplies list that I used, but I do understand that you might prefer to use other products.

Materials
Stamps: Autumn Days, Nature Walk, Lovely As A Tree, All A Flutter, Faith in Nature
Ink: Bashful Blue, Wild Wasabi, Early Espresso, Crumb Cake, Always Artichoke, Basic Black, marker pens in Perfect Plum, Old Olive, Bashful Blue, Riding Hood Red, So Saffron, More Mustard
Card: Whisper White, Very Vanilla, Forest Green (non-SU)
Paper: Everyday Enchantment Designer Series paper
Other: Simply Scored board & metric board, Lacey Leaf border punch (non-SU), Whisper White 5/8" Organza Ribbon, sponge daubers


Right, let's get cracking:

Cut out five pieces of white card measuring 17cm by 10cm.


Using your preferred means, sponge on a pale blue ink for the sky and a green for the ground.  You will have to come quite far down the card (about half way) with the blue ink.  I used sponge daubers to ink with as I find them very easy to use, together with Bashful Blue and Wild Wasabi ink.


Once you are happy with your inking, here is the fun bit!  Collect together your foliage stamps and ink them up in your chosen colours.  Don't feel you have to ink up the stamp every time you stamp with it: stamp two or three times gives a good sense of perspective to your scene.  I stamped the wheat stamp from Autumn Days in Crumb Cake, the longer grass stem from Autumn Days in Early Espresso, and the silhouette type grass from Autumn Days in Early Espresso and Always Artichoke.  I added in just the top of the pine tree stamp from Lovely As A Tree in Always Artichoke as it works great as a general foliage stamp in this way.  I stamped the wild grass stamp from Nature Walk in Old Olive and Perfect Plum (colouring in the stamp directly with my marker pens).


Add in some insects into the scene: I used the bees and the smaller butterfly from Nature Walk and the big butterfly from All A Flutter.  These were stamped in Basic Black and then coloured in directly with markers, or with my blender pen and markers (the colours I used were Riding Hood Red, So Saffron and More Mustard).


Cut five pieces of green card 20cm lengthways x 10cm high.  Score and fold these down the halfway point (10cm).  Also score and fold the stamped scenes you've just made down the halfway point (8.5cm).


Cut a sixth piece of green card measuring 21cm x 10cm and score and fold at 10cm, 10.5cm and 11cm.

When your cat decides it's bedtime, make sure you give him/her plenty of attention and obey immediately.


You will make him or her very happy!


Start again the next day.  Cut out five pieces of Whisper White card measuring 15cm x 10cm.  (If you use another brand of white card, make sure it's not too thick.  Remember it's going to be folded in the middle of the book.)

Measure 2.5cm down from the top and draw a pencil line.  Do the same 1.5cm up from the bottom edge.  Draw your curtains so they are relatively equal on either side.  I did this by making a pencil mark where I wanted them to start and end on each side and drawing free hand.

When you happy with your window, cut out the middle and use it as a template for the other four pieces of white card.
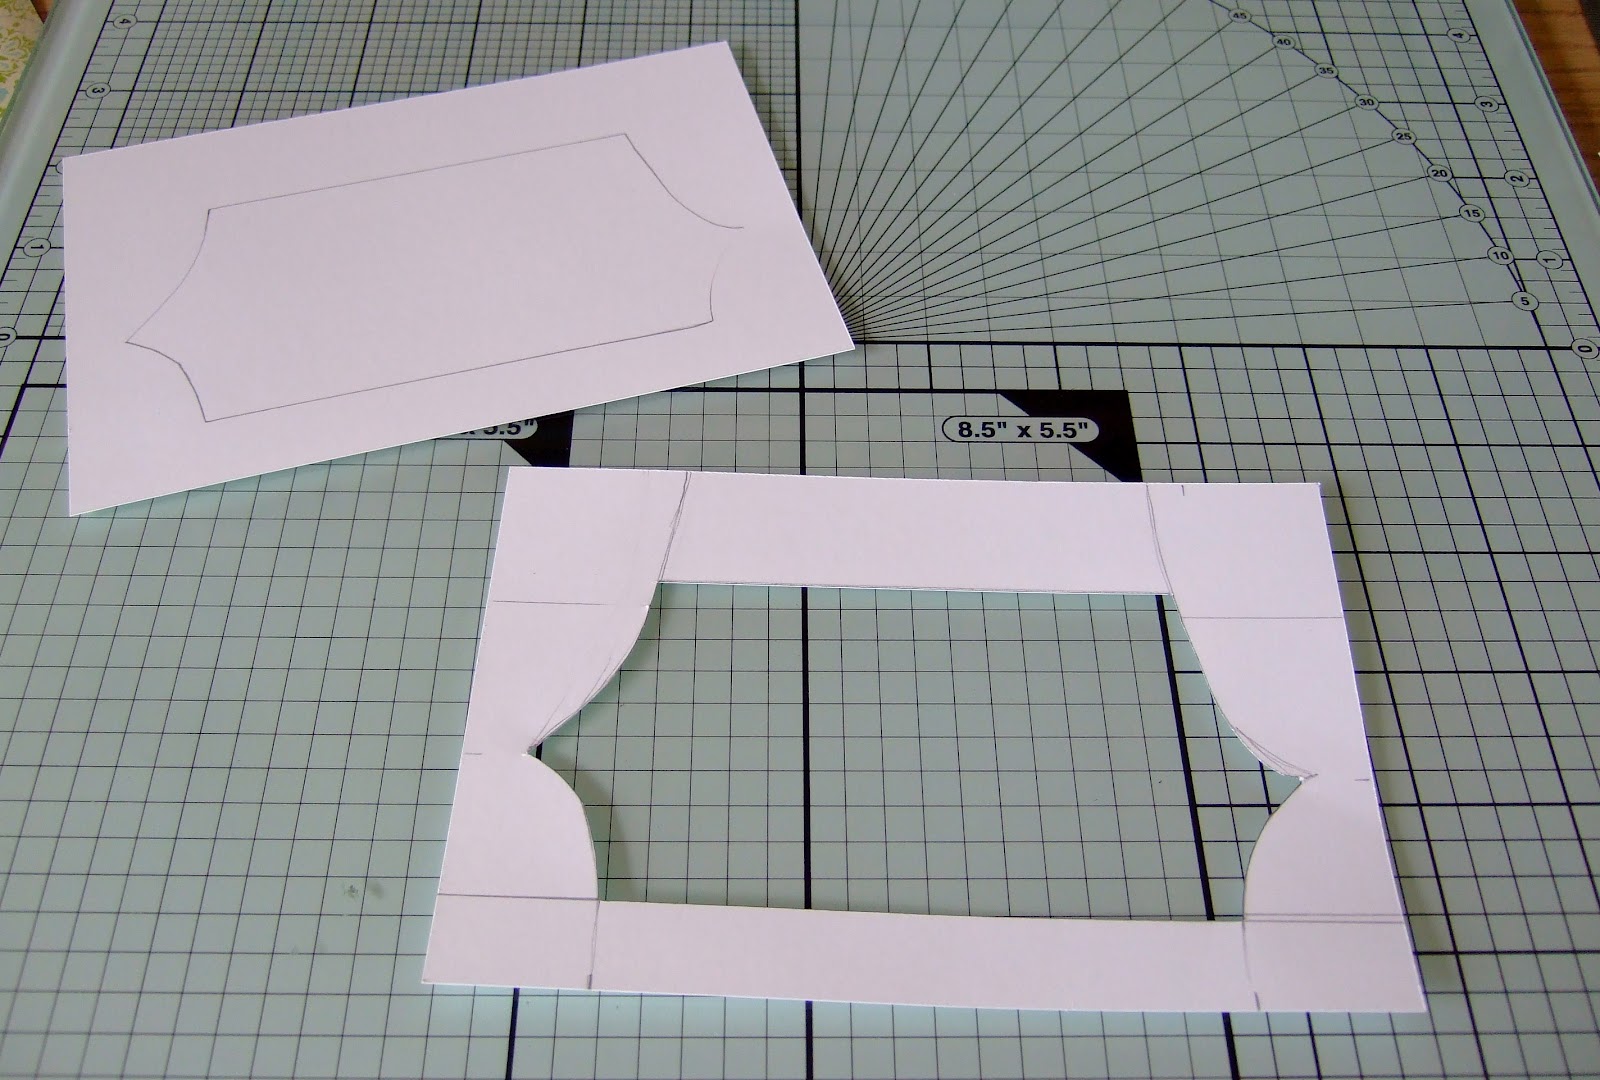

Cut out five lengths of 15cm x 1.5cm of Very Vanilla card.  Stick to the bottom length of your white base pieces.  (I forgot to do it in this order which is why the photos seem a bit out of sequence!)

Use one of your windows as a template to draw out your curtain shapes onto patterned paper.  I used this lovely sheet of Everyday Enchantment because it coordinates well with the colours in the garden scene.  You will need five left curtains and five right curtains. You might want to ink the edges a little depending on the paper you use.


Cut out five pieces of Very Vanilla card, measuring 15cm x 2.5cm.  Then cut out five pieces of the same patterned paper, measuring 15cm x 2cm.  Punch down one edge with a border punch.  Adhere the patterned paper to the Very Vanilla card, and then stick onto the white base piece.  Do this for all five pieces.


Stop for a snack.  I recommend homemade white chocolate and summer fruits cheesecake. ;-p Yum!


Put double-sided tape down the edges of each of the five green pieces of card and adhere the stamped scene in place, taking care to line up the edges carefully.  This is crucial!  You are not sticking down the whole thing!


Do the same thing with the window panel.  You are only adhering the very edges.  I used the really thin strips of double-sided tape for this bit.  Do this for all five panels.


Adhere ribbon securely with tape onto the back of one of these panels.  Cut off a good length of ribbon.


Take your front cover piece (the green card measuring 21cm x 10cm).  Line up the window panel you've just stuck the ribbon to with the front cover and stick together (the whole thing this time, not just the edge).  As you have three scored lines on the cover and it is 1cm longer than the other panels, it looks like it will stick out by 0.5cm in the centre - that's OK! - you need the extra length to work well as a cover for the book when it's closed.

Repeat this to secure the ribbon to the back of the cover and stick in another of your window panels.

Now it's a case of sticking in your other window panels.  I do like double-sided tape as it's a strong dry adhesive and holds the panels in place, but use the adhesive you prefer.


Your book will now look like this:


Cut a piece of Very Vanilla card, measuring 9cm square.  Stamp your front panel.  I did mine by colouring in the quotation from Faith in Nature in Old Olive and Perfect Plum markers, adding in the wild grass stamp from Nature Walk in the same colours.  The butterfly, also from Nature Walk, was stamped in Basic Black, and I coloured it using my blender pen and Riding Hood Red and So Saffron.  Attach to the front of your book.


In the photo above, you can see why those extra scored lines and extra 1cm are so important for the front cover.

When you undo the ribbon, you can pull the front and back covers round to create a star shape:


See the original post for more close-ups of the stamped panels.

Voila!  Of course you might want another snack by this point and your cat will almost certainly want some attention!

Hope this is relatively clear, but do let me know if any of it is confusing.  If any of these supplies have caught your eye, please do not hesitate to get in touch either by phone on 07977 141605 or by email.  I'd be delighted to assist you with your crafty makes and place an SU order for you.  If the patterned paper has caught your eye, it's limited edition and you only have until Tuesday to order it, so don't hang around!

If you make a star card using this tutorial, I'd love to see what you make, so do post your link in the comments.

Thanks for visiting and well done for surviving a very very long blog post!


Friday, 27 July 2012

Star Card of Garden Scenes

I'm really pleased with what I have to show you today, as it's been a real labour of love!  It combines some of my favourite things: inkiness and multi-stamping but in an unusual form.  From the outside, it just looks like a mini book:


The cover was stamped with the grass stem and butterfly from Nature Walk, with the quotation from Faith in Nature, as it seemed most fitting for what happens when you open it.....


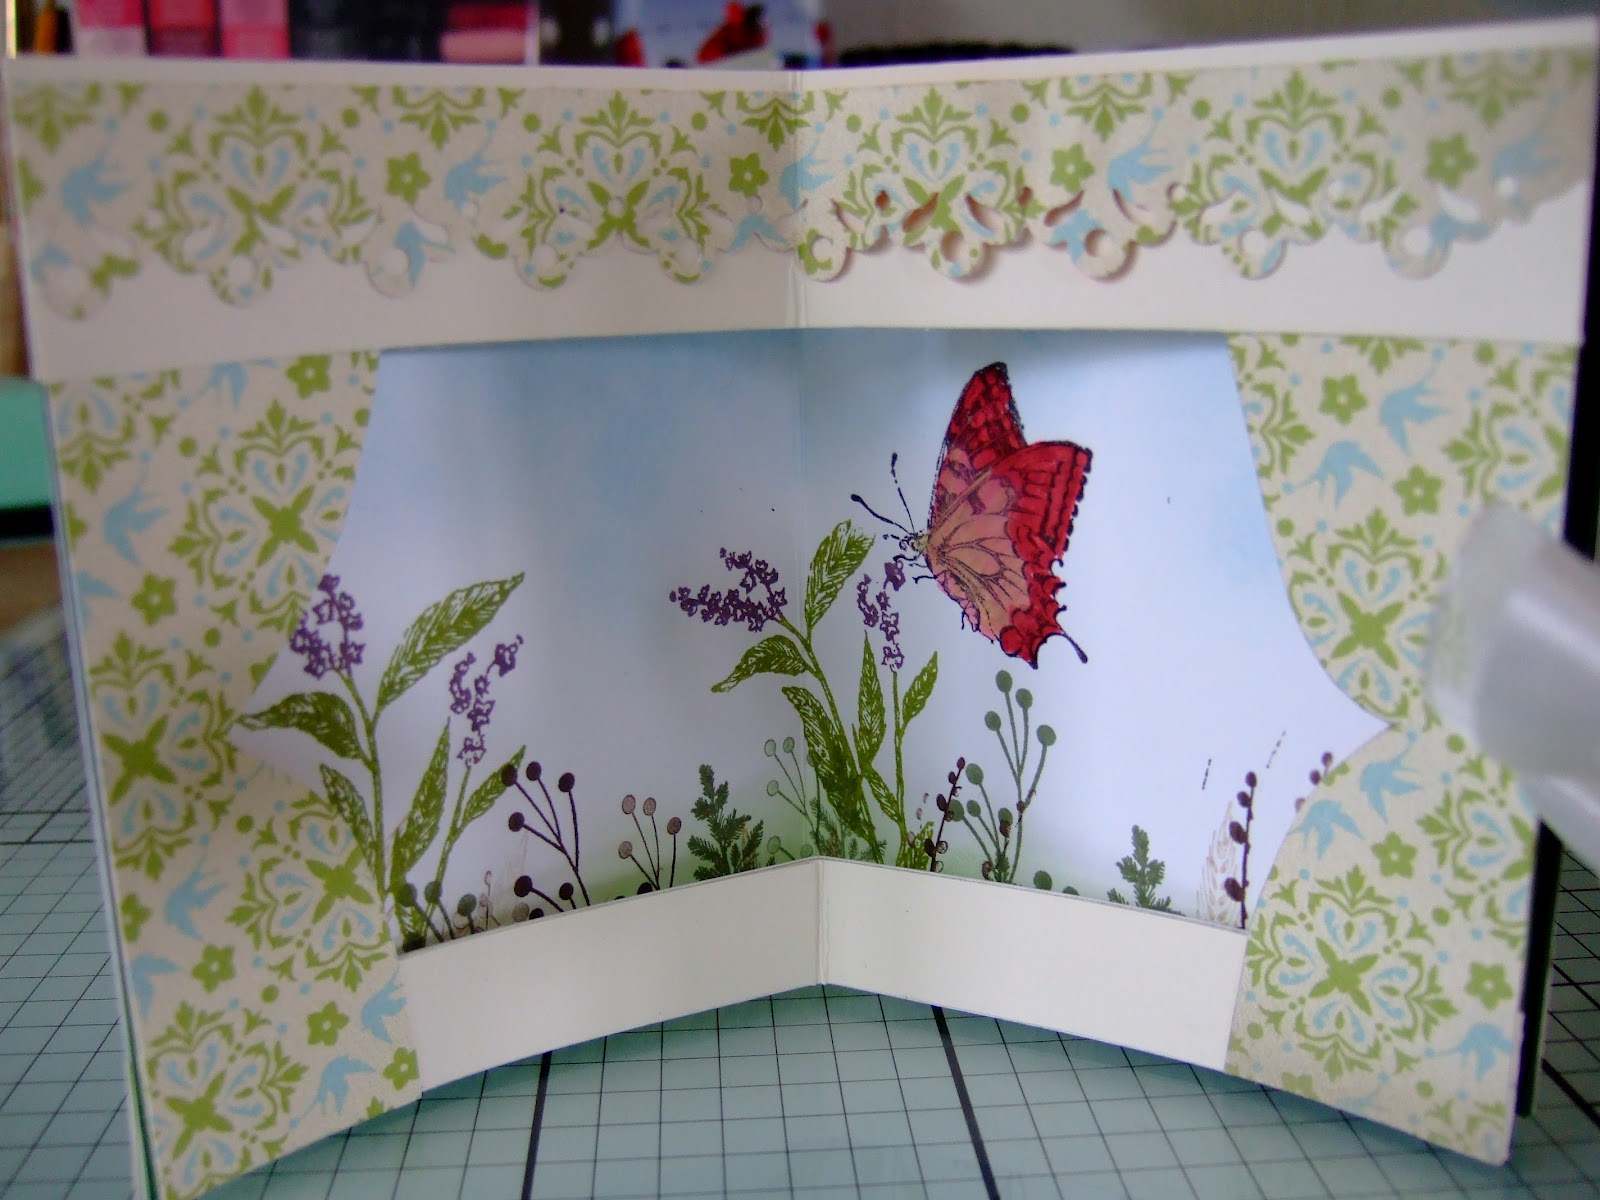
It opens out into a star shape, with each part of the star decorated to look like a window.  Come and have a closer look at each panel:


The garden scene has been created with stamps from Autumn Days, Nature Walk and Lovely As A Tree (using the tree top only makes for some great foliage).  The insects and butterflies are from Nature Walk and All A Flutter.  The curtains and windows are made from Very Vanilla card stock and Everyday Enchantment paper.

I'm putting together a tutorial on how to make this, mostly so I can remember the next time I want to make one, but if you're interested too, check back on my blog soon!  So with that in mind, I won't put my usual supply list as I'll include it with the more detailed instructions.  Edited to add: the tutorial can be found here.

I'd like to enter this into the 'In the Garden' scene challenge at Craft A Scene, 'Crafty Passion' challenge at Sir Stampalot (inky loveliness, playing around with stamps and trying to come up with something out of the ordinary all rank pretty highly on my list of crafty passions!) and 'This is the House That Jack Built' challenge at Daring Cardmakers.

Today's feline offering is not a photo, but a video, supplied by the lovely Sandy.  Thank you, Sandy!


Thanks ever so much for stopping by today,

Saturday, 14 July 2012

Up, Up & Away

It's one-layer week at Less is More where we are asked to include three of something, be it colours, stamps, words, the number...  It sounds so simple but it's been one of those LiM weeks where I get through lots of card trying to get it to look right.

In the end, this is what I made:


Three balloons and three birds from me.  To begin with I made a mask so I was only working in the centre of the card.  I made the sky by cutting a rough sort of cloud shape out of a post-it note and then dabbing on a bit of Bashful Blue, moving the post-it note around my sky.  I then inked the bottom with a bit of Wild Wasabi, stamping in some grasses from my Autumn Days set.

The balloons were each coloured and stamped, and I masked each one before stamping in the baskets as it didn't look right with the whole basket showing.  Three useful little birds from Up, Up & Away finished off the panel.  For a finishing touch, I scored a frame around the scene using my Simply Scored board.

Supplies
Stamps: Up, Up & Away, Autumn Days
Ink: Bashful Blue, Wild Wasabi, Always Artichoke, Basic Black, Real Red, marker pens in Rich Razzleberry, Daffodil Delight and Pacific Point
Card: Whisper White
Other: stamp-a-ma-jig, sponge daubers, Simply Scored board, post-it notes (and lots of them!)


I'm glad yesterday's scary cat photo made you laugh!  Today's picture is a tad more philosophical:


Thanks so much for stopping by my square metre of blogdom,

Monday, 9 April 2012

Chipboard Triptych

When asked by a friend to make a card for a 30th birthday, I thought 'no problem'.  Except that the birthday girl in question is a triplet and their mum was calling their joint birthday party 'The Big 90'.  Except that my friend had some rather definite ideas about what should be on the card... like a teepee and fairies and the house name and a garden.... the list went on....

After a few false starts, I decided to transform three pieces of chipboard into a triptych birthday card (one panel per triplet) and, after seven hours of constant creativity, here is the finished project:


I started by rubbing my Versamark ink pad around the edges of each piece of chipboard and embossing in gold.  I didn't want to see any chipboard edges.  This is the front cover:


Part of the garden scene is now revealed with the other side being left blank for my friend's birthday message.  This fairy (and the others) were all found on a copyright-free image website for tattoo artists!!  They were printed onto Whisper White card stock, coloured with my Versamarker pen and clear embossed, as were the titles.


The triptych garden scene is revealed!  The birthday triplets are having a teepee in the garden for their birthday party, hence its significance.  The teepee was made with triangular shapes of Very Vanilla card, with some craft wood stubs positioned at the top.

The panels were all created in the same way: the fairies were printed onto plain Whisper White card, then coloured with my Versamarker and clear embossed.  Next, the background was inked.  I used Bashful Blue for the sky and Crumb Cake and Old Olive for the ground.  Then came the fun bit: creating the garden.  This was entirely created with the marvellously versatile Autumn Days stamp set.  I used a combination of Early Espresso, Soft Suede, Old Olive, Always Artichoke, Garden Green and Crumb Cake inks.  Finally I added a few tiny paper flowers which were one of the first crafting goodies I ever bought for my supplies.  I've almost finished the packet now; I'm getting quite emotional at the thought of finishing it!


Here are close-up views of the central and right-hand panels:


And lastly, here is the funny back panel that my friend insisted on having as she thought the picture was so funny!


These panels were all mounted onto Early Espresso card and adhered to the chipboard.  I punched holes with my Crop-a-dile and tied them together with Whisper White ribbon.  I then made a box to house it and tied it up with ribbon.

Supplies
Stamps: Autumn Days
Inks:  Bashful Blue, Old Olive, Crumb Cake, Early Espresso, Soft Suede, Garden Green
Card:  Early Espresso, Whisper White, Very Vanilla
Other: Whisper White 5/8" satin ribbon, Crop-a-dile, Versamarker pen and Versamark inkpad, clear embossing powder, gold embossing powder, sponge daubers, heat tool
Non SU: tiny mulberry paper flowers, small stubs of craft wood, computer generated titles and silhouettes, 3 chipboard panels

This is one of the biggest scale projects I've ever done and I have to say I'm rather pleased with the result. While I'm feeling keen, I might have to give another big project a go!  As always, if you are interested in any SU supplies, please do not hesitate to get in touch by email or by phone on 07977 141605.  I will be delighted to assist you with your papercrafting projects!  During April, if your order comes to £45 or more, you also qualify for free designer paper! Click on the link in my sidebar to see your choices.

Challenges
Craft A Scene - silhouettes
Charisma Cardz - chipboard or stickers

Hope you like it! And if you want to see my Easter story themed chocolate cake I posted earlier, click here.  Enjoy the rest of your day!

Thanks as always for visiting - I look forward to visiting you back,

Monday, 2 April 2012

Spring Colours Meet Autumn Leaves

Firstly, a big thank you for all your well wishes after my operation.  I have been starting to feel a bit better over the past two days so I'm hopeful that I've turned the metaphorical corner and am on the mend.

It's Lucky Dip week at Less is More and Chrissie and Mandi have chosen a fabulous colour palette from Design Seeds to inspire us!  I must admit I can be a bit narrow when left to my own colour devices and I tend to neglect lovely pastel shades so it was nice to play with these.


I was inspired by a rainbow colours card by Lousette Ashton in March's Craft Stamper where she created a spectrum.  It looks like this technique will work with most colour combinations.  I also wanted to try to come up with another use for my postage stamp punch.

Here's what I made:


I punched some squares out of card scraps and layered them up on dimensionals, tying some linen thread across the bottom square.  The spray of rushes was all stamped on scrap Confetti Cream card and fussy cut out, again tied with linen thread and glued into place.  The sentiment was divided up onto two lines using my Stamp-a-ma-jig.  Here are a couple of other views:


Supplies
Stamps: Autumn Days, Happiest Birthday Wishes (hostess)
Inks: Always Artichoke, Crumb Cake
Card: Crumb Cake, Always Artichoke, Certainly Celery, Pink Pirouette, Pretty in Pink, Confetti Cream
Other: linen thread, Stamp-a-ma-jig

I'd be delighted to help answer any questions about SU or order some goodies for you.  Please do not hesitate to get in touch, either by email or by phone on 07977 141605. While Sale-a-bration has now finished, there is a new offer running to earn free designer paper if your order comes to £45 or more.  Please click the link in my sidebar to learn more.

Socks is being very naughty today, jumping up on the table and trying to get my attention any way he can.  He reminds me a lot of Simon's Cat of video fame, especially in this clip:


Thanks for visiting,

Thursday, 22 March 2012

Christmas Vermillion

Gosh, I'm late blogging today.  I have had a very personal battle with a petrol lawnmower, but I'm pleased to say I won although I was covered in grass by the end of the afternoon.  It has been gloriously sunny up here in Lancashire today, and I hope it has been where you are.  It's days like today that make me feel so much more upbeat!  Spring is here!

Today's card features Young Vermillion again, but this time as part of a Christmas card, which I'm entering into the 52 {Christmas} Card Throwdown Animals (& Birds) challenge.  I've not got any Christmas sets from SU (YET!) so I wanted to make the most of being able to enter a Christmassy card!  I also note that the ABC Christmas Challenge this fortnight is F is for Furry &/or Feathered Friends, so it will fit in nicely there too.


I inked up Young Vermillion with Early Espresso, Chocolate Chip, Crumb Cake and Cherry Cobbler markers before stamping him where I wanted onto my Very Vanilla card stock.  I lengthened the branch a little so it went off the panel... I didn't want him floating in space!   I added more colour for depth using markers and my blender pen, as I wanted him to look more like a robin than a Vermillion Flycatcher.  I'm not quite there yet, but getting closer!

The rather lovely pine cones are from Autumn Days which I inked up with Early Espresso and Always Artichoke markers before stamping around the edge, not always inking up each time, again for depth.  The sentiment is from Teeny Tiny Wishes, but I split it onto two lines using my Stamp-a-ma-jig... if you don't have one of these yet, I would heartily recommend one.  Not only are they fantastic for making sure you stamp where you want to every time, but you can also divide up your sentiment stamps, meaning you get even more use out of them!

This panel was then mounted onto Cherry Cobbler and Always Artichoke card, then more Very Vanilla and the card blank made from textured Early Espresso card.  I wanted to mount on all these colours because I'd used them in my stamping.  Here's a closer look:


Supplies
Stamps: Young Vermillion, Autumn Days, Teeny Tiny Wishes
Inks: Cherry Cobbler, Crumb Cake, Early Espresso, Chocolate Chip, Always Artichoke
Card: textured Early Espresso, Cherry Cobbler, Always Artichoke, Very Vanilla
Other: Stamp-a-ma-jig

Don't forget that you have just over 1 week left to benefit from Sale-a-bration, where you earn free stamp sets and designer paper for every £45 you spend.  I also have a prize draw running for a set of Everyday Enchantment Designer Series Paper and free P&P for my first three customers.  Please do not hesitate to get in touch either by email or by phone on 07977 141605 if you have any questions or if you would like to order some Stampin' Up! goodies.


Many thanks as always for visiting,

Wednesday, 21 March 2012

Autumn Leaves

I'm so pleased you liked the nappy cake I posted on Monday.  It was so much fun to make!  Back to cards today.  Chrissie and Mandi at Less is More are looking for CAS cards featuring 'masking' this week.  This is one of those challenges which you immediately think is going to be simple, but then you struggle to think of anything original!

This is what I came up with, using a couple of stamps from the wonderfully versatile Autumn Days stamp set.

It was very simply to make.  I started by cutting a shape from scrap paper to mask most of the card stock before stamping with the tiny leaf.  I used a whole range of autumnal colours because I wanted the hill to pop out!  I then coloured the pheasant in Cajun Craze, More Mustard, Garden Green and Early Espresso and stamped him onto the hill, making sure he was in the right place using my Stamp-a-ma-jig.

Here's a close up:


Supplies
Stamps: Autumn Days
Ink: Early Espresso, Crumb Cake, Cherry Cobbler, Cajun Craze, Garden Green, More Mustard, Always Artichoke
Card: Confetti Cream
Other:  Stamp-a-ma-jig


Don't forget that you have just over 1 week left to benefit from Sale-a-bration, where you earn free stamp sets and designer paper for every £45 you spend.  I also have a prize draw running for a set of Everyday Enchantment Designer Series Paper and free P&P for my first three customers.  Please do not hesitate to get in touch if you have any questions or if you would like to order some Stampin' Up! goodies.

Again, no interesting titbit to share with you from my own life, so here is a video of a floppy disk drive (remember those?) but not as you know it...


Thanks for visiting me today,

Blogger template designed By The Sunday Studio.